Monday, June 28, 2021

Portfolio Piece 02 - Week 02

 For this week of my portfolio piece, I continued progressing my high res sculpt of Nautilus as well as his "anchor" (with this skin, it is two light guns combined stuck together with a handle). Prior to continuing on the piece, I reached out to the original creator of the concept, Ron Broyde to get his ideas on how he wanted the legs and back to be like. However, he stated he was too busy to concept more to the concept/did not have an idea for how they should be. He gave me the go ahead anyway to continue working on the skin and add to it how I see fit.

Original Concept

Zbrush sculpt so far

Zbrush sculpt of anchor

Zbrush sculpt of Nautilus

When it comes to the actual sculpting, I took my teacher Nick's advice to set up an image plane/spotlight to help with getting proportions more accurate to the concept. Once I did, I didn't realize how much of a difference it could make, as taking a look at how I had my block out last week, the difference is huge, at least when it came to the head area. Even though the concept is in a three quarter view, being able to have custom camera angles to go back to to help compare the proportions is a great help.

Having a spotlight image setup of the concept over my sculpt

When it came to sculpting areas that were not shown in the concept, I took to look at previous Nautilus skins to get inspiration how I could tackle areas like the leg. Upon my research, I was able to find the site Teemo.GG that has all the models of League champs to look at and study. I decided on Abyssal Nautilus as it appears he has armor over his actual leg parts. With this, I decided on having a thigh armor piece that I will add to and then have a tube like leg inside to fill the leg armor pieces.

Abyssal Nautilus

I had planned to get my sculpt done this week, however, the anchor took up a lot of my work time. Reason being is I decided to challenge myself and model and sculpt it all inside of Zbrush rather than taking it from Maya and then sculpt on it. That is the easier and more familiar approach, but I wanted to learn more of what Zmodeler has to offer and learn to do more inside of Zbrush as I have seen many wonderful sculpts created purely in Zbrush whether it be hard surface or organic. I started by making one light gun and then create the handle as well as triangle pieces to wedge the light guns in. I would bring over a merged light gun and mirror and weld the other side to create the symmetry. 

When it comes to what still needs to be done on the sculpt, I need to finish the leg armor pieces, polish on the jacket and zipper area for it, and then shoulder armor piece. I hope that the amount of time and effort I have put into the sculpt will pay off when I do my textures to save me time rather than paint in textures from scratch on a low poly.


Sunday, June 20, 2021

Portfolio Piece 02 - Week 01

 Time for my second portfolio piece for this summer of 3D Art! Keeping in tradition with what I had previously worked on, I will be continuing on working on League of Legends art based off of fan concept arts. This time, I will be focusing on Arcade Nautilus by Ron Broyde from Skintober 2020:


Original concept


I had originally stumbled upon this a few months ago when I simply googled for League of Legends fan skin ideas. One of the top searches happened to be this image which I quickly gravitated to as I am a big fan of the League of Legends Arcade skin line that focuses on retro video games in particular. When it comes to Nautilus here, he is literally a walking arcade cabinet and in place of a sea anchor for well his anchor, he has two light guns stuck together instead (which I didn't even realize when I originally saw it!) The colors used also give me a retro vibe as well. I just think it's pretty creative how Roy was able to think up this creation and got it to work with Nautilus's silhouette so well and embody his original shape language while adding his own twist and vibe to the champion. Additionally, when me and friend started playing League last year, Nautlilus was one of his first main champs he played, so I think it's cool for me to work on a skin design for him.

Some more references

As this concept design only really shows the front side of the champion, I have more liberties when it comes to how he looks from the back and in areas not seen. However, I will be contacting Roy to see if he has any input on how he would add to the character and help make his original idea come to fruition. As for my timeline on this piece, it'll go as follows:

Week 1: Plan out project/block out/sculpt high res version
Week 2: Polish sculpt, game res, and UV/Bake. Additionally I will be trying to rig early to help with texturing
Week 3: Finish rigging and start texturing
Week 4: Polish texturing and presentation

With how my Amumu went last time, I think the timeline is doable assuming I keep on top of it and don't fall behind. Falling behind will end up snowballing out of control, so I will need to be sure to stay on top of it and if anything end up giving myself leeway rather than no room for mistakes.

Initial Zbrush blockout for main body

Pushing the blockout more


Sunday, June 13, 2021

Portfolio Piece 01 - Week 04

 This is the final week for our first portfolio piece of the Summer semester. Or as I hoped. Even though I had a great head start with this project, I ended up falling short of my timeline when it came to keeping up with it and completing everything I had hoped on time. However, what this project did let me realize is how much time I should properly a lot to each task and how each task would end up taking me. Even though I am behind when it comes to a finished product for this project, I ended up learning a lot on a new workflow when it comes to hand painted 3D models which combines usage of baking normal maps while still having that personal touch through handpainting by hand. 

For this week, I spent a long time when it came to UVing, not because there was anything wrong inherently wrong with the geo, but rather I wanted to follow some "rules" per say when it came to handpainted texturing akin to what Riot does for League:

1. Optimize UV space to be as efficient as possible

2. Make sure everything has proper texel density as much as possible

3. Layout UVs to where it can identifiable rather than just auto layout

4. Try to keep UVs as straight as possible

5. Try to use symmetry as much as possible to save space/time (For Riot, a lot of times, heads are not symmetrical for they are usually unique for both sides as well as the main torso, because the head could cast shadows that are asymmetrical.

With that in mind, I was able to get decent UVs established and I was able to use Marmoset to try baking my maps this time around and I must say I liked how simple it was to bake compared to Painter.


Baked Mesh

After getting my bake done, I proceeded to follow this workflow when it came to the texturing process:

1. Combine AO map and green channel of the bent normal map
2. Fix any AO bake errors and grayscale value paint in details
3. Apply gradient maps for base colors
4. Paint in more details/fix any errors
5. Polish textures

GIF of the texture process up this point

Turn around of current texture progress


As far as the remainder of this project goes, I will need to do these four things to be portfolio publishable:

    1. Finish texturing (polish up details and paint in final lighting)
    2. Rig and pose character
    3. Create a diorama base for renders
    4. Stretch goal: display character in League's Summoner's Rift

Sunday, June 6, 2021

Portfolio Piece 01 - Week 03


For this week, I began work on retopology when it comes to my Amumu character. When it comes to retopology, I made sure to follow League of Legends art guidelines from previous contests hosted by Polycount and Rio as well as official League of Legends skins. Important points to know is that:

-There is no real limit to how much geo is allowed for the low poly. However, it is important to have the polycount be used optimally and not have dense geo for no good reason and vice versa. (After getting some feedback from Nick Zuccarello, I will be going back to take a quick look at my geo to see if I can optimize some areas. I had 99% of the model soft edged and I could definitely benefit from hard edging some areas if seams permit.

-The low poly should follow the high poly as far as shapes go, but let the finer details be baked in later to help with the AO and facilitate the diffuse map. Touching back on geo, I should also focus on making sure more apparent round areas more rounded and save polycount elsewhere.

-Make sure the wireframes are close to the high poly sculpt when it comes to matching the details to the sculpt. It will help facilitate the bake as well as the diffuse map better.

When it comes to the retopology, I also made sure to take a look at wireframes of professional League skins to see edge flow and the different topologizes for League characters.

As for polycount, I was able to 9.2 K tris when it comes to the whole model where Amumu himself takes about 5-6 K tris and the lights take up 2-3 K tris. With cleaning up more of the topology I should be able to bump down the count down maybe at most 1 K tris.


Zbrush Sculpt from previous week

Low Poly and Wireframe

As for the next step, I will begin UVing after doing a pass on the geo. Afterwards comes the baking, texturing, rigging, and final presentation.

Tuesday, June 1, 2021

Portfolio Piece 01 - Week 02

For this week, I finalized my Zbrush high res sculpt of Amumu by polishing up areas like the cuffs and hands as well as add in the Christmas lights which plays a big part of the skin concept. In order to do this, I had to use to rough paintover I did last week:

Paintover of how to do the Christmas lights wrapping


This was important as due to the perspective of the original fan concept, it is hard to discern nor did it matter how the wires were wrapped around Amumu when it came to the start and end of the wire. After experimenting around I established that the above method of wrapping made the most logical sense while maintaining the looks of the original concept by Noah Warner. 

When it came to actually creating the lights, I initially looked into the curves tool, but upon some research, I stumbled upon another idea with using Zspheres to block out the wires and then changing them into an adaptive skin. Dude to the fact that the upper body and lower body are currently separate, I opted the Zspheres method when it came to creating the wires. However, this experience taught me there are multiple ways to go about tackling such an issue and to use which ever way one is more comfortable with/efficient with for the situation at hand.

Creating the ends of the wires has also been fun as I got to mess around and use the Zmodeler brush more. So far this project has taught me a lot when it came to blocking out and box modeling inside of Zbrush without having to use Maya as well as a whole bunch of Zbrush tricks I had not properly looked into before.

When it came to the lights themselves, I simply created an Insert Mesh brush and saved it as well if I ever decide to do more Christmas themed skins or models of sorts.

As for the next step, I will need to go into Maya for retopology and UVs. Originally I had planned to learn and use 3DCoat's retopology tools and see how it compares to Maya's, but for times sake this time around, I opted to go with something I am comfortable with. Next time I want to dive deeper into 3DCoat's tools.

Final Zbrush sculpt

Start to retopology

With regards to my current timeline, spending time to learn how to do the lights as well as it being Memorial Day weekend, I ended falling behind on my timeline. As such I will need to put more hours in on project to catch up. I will need to finalize textures by this Sunday/Monday in order to get on track with rigging and presentation work on the last week. I am excited to see the progress on this project and how it is actually coming to life!


Friday, May 28, 2021

Sprint #8 Delivery VR Project


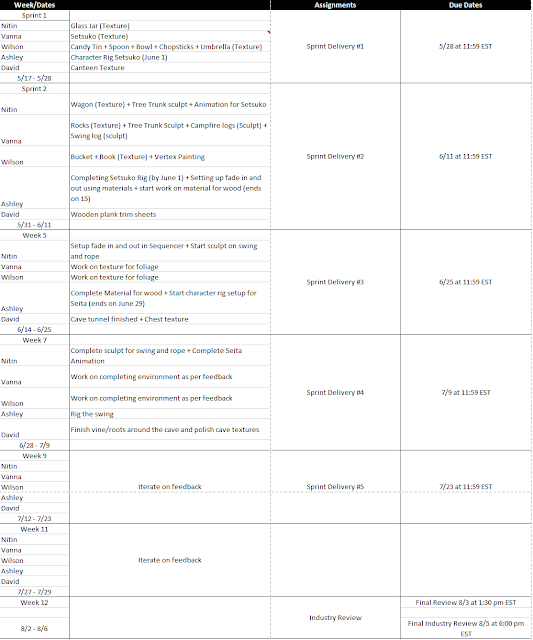
For the start of the new Summer semester, we have been tasked with discussing with out team and planning out the sprints for the remainder of the VR experience project. Initially we created individual deadlines we had established during the first class, but after getting feedback from our teachers, we created a more broader version to follow along with the Sprint deliveries for the class overall.

Personal team deadlines


New sprint schedule

When it comes to my current tasks, I am currently in Zbrush polishing my models and such when it comes to my assets that need to be textured for our current sprint still: Candy Tin, Bowl, Spoon, Chopsticks, and Umbrella. I underestimated how much time it would actually take and am working over this night to catch up on and will post updated pictures of where they are at later.

We it comes to texturing, we will be following this video from Stylized Station and make changes as needed to make sure all our art assets fit together nicely. 
For color choices, out art lead Vanna was able to curate colors for me to follow as a base and tweak as needed to help all the assets match:


Sunday, May 23, 2021

Portfolio Piece 01 - Week 01

Time to start the Summer semester off with the first assignment of 3D Art III. We are now spending class time to create personal portfolio pieces uniquely tailored to our interests and what we want to do. After picking out some choices and getting feedback from Nick Zuccerello, our teacher, I landed on creating a League of Legends fan skin with WINTER WONDER AMUMU:

Main concept art by Noah Warner

Additional references

I am a big fan of Riot Game's League of Legends and in my opinion, they have fine tuned their hand painted art assets to be a staple of the franchise no matter which game in the in-game universe. From what use to be low-poly low res art has become one with more of a style with a personal touch. I was browsing through Google and Artstation and came about this fan concept of Amumu, a champion from the game. Personally I don't play the champion much, but I have always enjoyed the whimsical sad vibes of the character that it has become synonymous for. However, the champion is outdated when it comes to his model, animations, and VFX. One way a champion is able to have some changes is through skins and I feel in this case, even though Amumu has a Christmas theme skin, this one gives him a Cuphead feel while incorporating elements of the holidays. His signature sad face is still present and is a ironic contrast to he warmth and celebratory nature of Christmas.

Since everyone has different projects, we need to have a custom plan of attack to have a finished product in four weeks time. At the moment, we are at week 1, but time is money and we need to get working in order to make best use of time to create a well polished project by the end.

Here is my plan of attack:

Week 1: Block out to high res sculpt
Week 2: Game res/UV, begin texturing (AO/gradients/base color)
Week 3: Texturing and polish, start rigging
Week 4: Posing, final display of work

When it comes to displaying the work, I want to follow more of what I have been seeing when it comes to displaying work for League of Legends. In the case of the characters, there is a big emphasis of having the character be shown on the game's Summoner's Rift map. The reasoning being, is because it's important to get a sense of scale of how the character fits into the game as well with it's surroundings and other champions/assets. I want to also be able to display the champion posed to with effects drawn in to help visualize the skin in action with it's own abilities with the Winter holiday twist. A big inspiration when it comes to the display of the work will come from Yekaterina Bourykina, who happens to also have made my favorite skin in the game: Spirit Blossom Ahri.

Week 1 Progress Check:

Even though we are free to set our own pace and schedule for this piece during the allotted time frame, I was very eager to get started with it as a dream company of mine is Riot Games and I want to create art of League of Legends. To start, I began with a simple blockout inside of Zbrush:

Zbrush Blockout
Following that, I began to sculpt in more of the shape of the head as it is the signature part of the skin as well the character. It was important for me to make sure to have Amumu's sad boy face showing on the piece. Looking at Amumu's base official model. Riot didn't put enough emphasis on that aspect, and as such I feel skin's should compensate for that and show Amumu's true spirit. Following that, I sculpted on the lower half with the main body, slippers, and hands:

Zbrush Sculpt as of Week 1
When it comes to my week 1 progress, I am pretty satisfied, although I slightly missed the mark by not have the Christmas lights sculpted in. As I only spent the weekend working on it, it is evident if I spend weekdays as well, I can easily make my plan. For the following week, in addition to what I need to accomplish for week 2, I need to polish to my Zbrush sculpt and add in the Christmas lights. As a side note: I did a rough paintover to help me better understand how to have the lights wrap around Amumu as the concept art boggled my mind and felt weird:
Front and back of the block out to help me better visualize the lights


Research Project

 For my research project, I decided on learning more on about how to create stylized hair in Zbrush as well as focus on creating cleaner sha...